Tuesday, September 8, 2015

Monday, June 8, 2015
ITE Chapter 6 Review topics
Characteristics of Hub, Bridge, Switch, Router
What is an ISR
Advantages of Cellular Connectivity
Dial up vs DSL
ISDN (BRI, PRI)
cable
physical vs logical topologies (physical layout vs how host accesses the media)
Cable / Network preventive maintenance
APIPA, local link addressing
LAN, WAN, MAN, PAN
802.11 standards
Coaxial cable
IPv6 basics - 3 parts of the address, compression
IPv4 basics - 2 parts
UDP
TCP
Ethernet (802.3, CSMA/CD)
Cat 5 Standards
Client server compared to Peer to Peer
types of network data
When is a peripheral considered a host
Troubleshoot default gateway issues
Breakdown 100Base-TX. What does each component represent
Troubleshoot NICS and data transfer rates.
OSI TCP/IP models
What is an ISR
Advantages of Cellular Connectivity
Dial up vs DSL
ISDN (BRI, PRI)
cable
physical vs logical topologies (physical layout vs how host accesses the media)
Cable / Network preventive maintenance
APIPA, local link addressing
LAN, WAN, MAN, PAN
802.11 standards
Coaxial cable
IPv6 basics - 3 parts of the address, compression
IPv4 basics - 2 parts
UDP
TCP
Ethernet (802.3, CSMA/CD)
Cat 5 Standards
Client server compared to Peer to Peer
types of network data
When is a peripheral considered a host
Troubleshoot default gateway issues
Breakdown 100Base-TX. What does each component represent
Troubleshoot NICS and data transfer rates.
OSI TCP/IP models
Monday, June 1, 2015
ITE 1 June 2015
1 June 2015 - IT Essentials Chapter 6
Today you will review OSI and TCP/IP models and wireless standards, watch a video on topologies then focus on completing chapter 6.
Learning Targets:
You will be able to:
List the layers of the OSI and TCP/IP reference models and the basic functionality of each layer.
Describe the difference between a physical and logical topology and diagram each if asked.
Know the IEEE standards for wireless networking
Intall and configure both wired and wireless network cards and routers
Configure an OS for networking
1. complete the OSI quiz on the following sites:

http://compnetworking.about.com/od/osimodel/l/aa031101a.htm
http://www.proprofs.com/quiz-school/story.php?title=osi-model_6
2. Wireless flashcards
https://quizlet.com/Stephanie_Grover/folders/chapter-4-network-access
3. Physical vs Logical Topology video clip
Review the difference between physical and logical topologies. I have shared 2 videos presenting the information in 2 different manners.
4. Pick up with 6.8 computer to network connection completing labs and filling out the packet.
Do 6.8.2.2 worksheet
Labs: 6.2.8.4 - There are 2 wireless card in the room. Zack can help locate them - One is installed in his system. Take turns installing and uninstalling those cards. If Zack's system needs a NIC, install a wired card.Do 6.8.2.9 packet tracer while waiting for one of the wireless cards.
6.8.3 Wireless and Wired Router Configurations
Read and do labs and packet tracer activities.
One of the routers is attached to a system Paul was using. There are two more routers, new the box, on the solder station. You may use those, but ensure that they are put back at the end of the day.
Tip: Check you TCP/IPv4 properties are you using DCHP or statically assigned? Is you current address on the same subnet as the router's?
6.8.3.13 requires both a wireless NIC and a router. you will have to work in teams.
6.8.4 read, fill out packet, complete labs.
Wednesday, April 8, 2015
8 April 2015
Bring the switches to the horse shoe to complete the assigned Practicals:
Practical 1; SWITCH AND TWO COMPUTERS
Practical 2: TWO SWITCHES AND TWO COMPUTERS
You can work with partners.
If you have equipment issues, use packet tracer.
The practicals call for two commands we have not talked about yet - the logging synchronous and the no ip domain-lookup commands. Watch the video clips to learn why they are useful.
Assign the switch IP address to VLAN 1 using the following commands:

Practical 1; SWITCH AND TWO COMPUTERS
Practical 2: TWO SWITCHES AND TWO COMPUTERS
You can work with partners.
If you have equipment issues, use packet tracer.
The practicals call for two commands we have not talked about yet - the logging synchronous and the no ip domain-lookup commands. Watch the video clips to learn why they are useful.
Assign the switch IP address to VLAN 1 using the following commands:
Example:
interface
Vlan1
description
Switch Telnet Connection (Answer
may vary)
ip
address 192.168.1.1 255.255.255.0
no
shutdown
Friday, March 27, 2015
ITN Chapter 6 Review Questions
Chapter 6 Review Questions
How does a remote end acknowledge receipt of a connectionless protocol?
IPv4 fields and their purposes
IPv6 fields and their purposes
How does IPv6 handle NAT?
What are the two ways a host can display routing table
How do router forward traffic
Cisco routers: Know the iOS load sequence and where the files reside. How does this affect configuration files during an unexpected shut down. (which are lost)
Types of memory and their function
Configure a VTY interface
Why would a router boot from an iOS copy stored in ROM
What is the purpose of copy run start
What commands are used to secure a console connection
Interfaces: How do you activate an interface, then ensure that it is operational
Show commands
How would you ensure that your RAM and flash memory can support an upgrade?
How does a remote end acknowledge receipt of a connectionless protocol?
IPv4 fields and their purposes
IPv6 fields and their purposes
How does IPv6 handle NAT?
What are the two ways a host can display routing table
How do router forward traffic
Cisco routers: Know the iOS load sequence and where the files reside. How does this affect configuration files during an unexpected shut down. (which are lost)
Types of memory and their function
Configure a VTY interface
Why would a router boot from an iOS copy stored in ROM
What is the purpose of copy run start
What commands are used to secure a console connection
Interfaces: How do you activate an interface, then ensure that it is operational
Show commands
How would you ensure that your RAM and flash memory can support an upgrade?
Friday, March 6, 2015
Layer 3 Switching Chapter 5
A couple of links to help explain layer 3 switcihing
http://searchnetworking.techtarget.com/tip/Layer-3-switches-explained
https://kb.meraki.com/knowledge_base/layer-3-versus-layer-2-switch-for-vlans
http://searchnetworking.techtarget.com/tip/Layer-3-switches-explained
https://kb.meraki.com/knowledge_base/layer-3-versus-layer-2-switch-for-vlans
Friday, February 6, 2015
6 Feb 2015 - Chap 4 Review
Review Topics:
Which layer is responsible for encapsulation
Describe signaling
Why does the physical later use frame encoding
Through put vs goodput
copper cabling issues
cancellation
termination issues
rollover vs straight through vs cross over
fiber multi mode - full duplex
copper vs fiber
wireless concerns when designing a network
802.11 standards
data link's job
sending frames - start and stop bits
physical vs logical topologies
802.11 - CSMA/CA
CSMA/CD
purpose of FCS
Data Link sublayers
Test has been activated.
6 Feb 2015 CCNA - Chapter 4: 4.4 Media Access Control
4.4 Media Access Control
4.4.1.1
The Media Access Control sublayer determines how data frames are put on the media.
The actual media access control method depends on;
Topology - the connection between nodes
Media Sharing - how the nodes share the media - Point to Point (WAN) or LAN
4.4.1.2 / 4.4.3.1
Review the difference between physical and logical topologies
4.4.2.1
Common WAN topologies: Point to Point, Hub and Spoke, Mesh4.4.2.2
Physical Point to Point directly connects 2 nodes (the serial connection between routers)
4.4.2.3
In a logical Point to Point a virtual (logical) connection is made between the nodes, but the physical connection may contain intermediary devices.
4.4.2.4
Data can flow using either Half or Full Duplex communication in a point to point topology
4.4.3.2 / 4.4.3.3
Logical topology is closely tied to how data is is sent and received on the network media.
There are two basic media access control methods for shared media:
- Contention-based access: All nodes compete for the use of the medium but have a plan if there are collisions. Figure 1 shows contention-based access.
CMSA/CD Wired 802.3 Eithernet
CMSA/CA Wireless 802.11
- Controlled access: Each node has its own time to use the medium. Figure 2 shows controlled access.
The data link layer protocol dictates which media access control method will provide the appropriate balance between frame control, frame protection and network overhead
New Term: non-deterministic contention based - a device can attempt to access the medial whenever it has data to send. CSMA (Carrier Sensing Media Access) prevents chaos.
CD - Collision Detection listens for the presence of a data signal. No signal - it sends.
CA - Collision Avoidance listens for the presence of a data signal. No signal - sends an notificaiton of intent to send. Once it receives a clear to transmit, it sends the data.
4.4.3.5
Controlled access method - devices take turns to access the medium.
Token Ring (IEEE 802.5)
Fiber Distributed Data Interface (FFDI)
Both now obsolete
Review the Ring Topology and do Activity 4.4.3.7
4.4.4 Data Link Frame
Please Read the Section
A Data Link Frame has 3 basic parts: Header, Data and Trailer
But they are formatted differently depending on the protocol used: Ethernet, PPP or 802.11
Complete Activity 4.4.4.9
Wednesday, January 28, 2015
28 Jan 15 - CCNA 4.3

4.3.1 Purpose of the Data Link Layer
The Data Link Layer is responsible for the exchange of frames between nodes over a physical network media.It performs two specific services:
- Accepts Layer 3 packets and packages them into frames
- Controls media access control and performs error detection
Logical Link Control (LLC)
Media Access Control (MAC)

Watch this. It concisely explains 4.3.1.2 -4.3.1.4
28 Jan 2015 - Fiber Optic and Wireless
Fiber Optics
Please follow the link to the quizlet review for 4.2.3 coveringTypes of Fiber
Fiber Connectors
Fiber Cables
Fiber Optic Cabling Review - Quizlet
UTP Versus Fiber

Wireless Media
Wireless is not restricted to conductors or pathways and provides great mobility. However, it does have some concerns when designing a network:Coverage Area
Interference
Security
4.2.4.2 - Types of Wireless Media

IEEE 802.11 standards Review
Do:
Lab 4.2.4. Packet Tracer - Connecting a Wired and Wireless LAN
Email Screenshot to s.grover@msad17.org
Lab 4.2.4.6 Viewing Wired and Wireless NIC Information.
Email Screenshot to s.grover@msad17.orgre
Tuesday, January 27, 2015
27 Jan 15 - CCNA Chap 4 Review 4.2
Chap 4 Review 4.2 - Network Media
4.2.1 Copper Cabling
Copper Cabling is inexpensive, easy to install and has low resistance to electrical current, but is limited by distance and signal interference.
What is Signal Attenuation?
What are the 2 sources of interference that can distort an electrical pulse?
Define EMI and RFI. What is Crosstalk?
How can electronic noise on a copper cable be limited?
There are 3 main types of copper media:
What are the 2 common variations
It's popularity declined with the decline of Token Ring networks, but the 10GB Ethernet standard has renewed interest in it.

Although UTP has essentially replaced coax, which 2 installation types have adapted for its use?
4.2.1.6 What are the fire and electrical hazards associated with copper cable?
List some best practices to avoid these hazards.
4.2.2 - UTP Cabling
4.2.2.1 Review UTP specs: # of pairs, color-coding, twisting, wire gauge,.....
UTP does not use shielding. How is the negative effect of crosstalk limited?
What is Cancellation?
How does varying the # of twist per wire pair enhance cancellation?
4.2.2.2 What are some of the elements defined by the TIA/EIA-568A standard?
What distinguishes the difference between CAT 5 and CAT6 cable
4.2.2.3/4 Know the pin outs for straight through and crossover cables.
Identify a properly terminated cable and a cable with a bad connector.
When is straight through, crossover or rollover used?
 4.2.3 Fiber Optic
How are bits encoded on a fiber optic cable?
Is fiber optic cable susceptible to EMI and RFI?
How is fiber optic used in the following industries:
 4.2.3.2 - Identify and describe the components of a fiber cable.
Optical fiber is proof tested through a rigorous manufacturing process for strength at a minimum of 100,000 pounds per square inch.
Taking a break - Will link in a couple worksheets comparing multi and single mode fiber, and different connectors
4.2.1 Copper Cabling
Copper Cabling is inexpensive, easy to install and has low resistance to electrical current, but is limited by distance and signal interference.
What is Signal Attenuation?
What are the 2 sources of interference that can distort an electrical pulse?
Define EMI and RFI. What is Crosstalk?
How can electronic noise on a copper cable be limited?
There are 3 main types of copper media:
- 4.2.1.3 Unshielded Twisted Pair (UTP) terminated with RJ-45
- 4.2.1.4 Shielded Twisted Pair (STP) terminated with RJ-45
What are the 2 common variations
It's popularity declined with the decline of Token Ring networks, but the 10GB Ethernet standard has renewed interest in it.
- 4.2.1.5 Coaxial Cable
Although UTP has essentially replaced coax, which 2 installation types have adapted for its use?
4.2.1.6 What are the fire and electrical hazards associated with copper cable?
List some best practices to avoid these hazards.
4.2.2 - UTP Cabling
4.2.2.1 Review UTP specs: # of pairs, color-coding, twisting, wire gauge,.....
UTP does not use shielding. How is the negative effect of crosstalk limited?
What is Cancellation?
How does varying the # of twist per wire pair enhance cancellation?
4.2.2.2 What are some of the elements defined by the TIA/EIA-568A standard?
What distinguishes the difference between CAT 5 and CAT6 cable
4.2.2.3/4 Know the pin outs for straight through and crossover cables.
Identify a properly terminated cable and a cable with a bad connector.
When is straight through, crossover or rollover used?
How are bits encoded on a fiber optic cable?
Is fiber optic cable susceptible to EMI and RFI?
How is fiber optic used in the following industries:
- Enterprise Networks
- FTTH and Access Networks
- Long-Haul Networks
- Submarine Networks
Optical fiber is proof tested through a rigorous manufacturing process for strength at a minimum of 100,000 pounds per square inch.
Taking a break - Will link in a couple worksheets comparing multi and single mode fiber, and different connectors
4 March 2015 - CCNA Chap 4 Review 4.1
Chapter 4 - Network Access 4.1 Physical Layer Protocols

Review
4.0.1.1 -
Terms related to the physical or wireless connection to a network: WAP. ISR, LAN, NIC, WLAN
4.1.2
The OSI physical layer provides the means to transport the bits that make up a data link later frame across the network media.
What is the process that data undergoes from source node to destination?
Review the PDU encapsulation process
What are the 3 basic forms of network media?
4.1.3
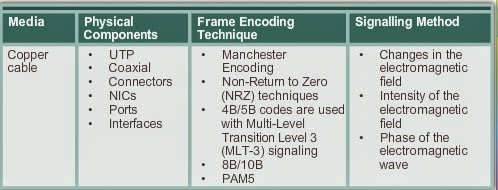
The 3 functional areas that the physical layer addresses: Physical components, Encoding and Signaling

How does throughput differ from goodput?
What is latency?
4.1.3.4 What role do standards play in defining media?
DO: 4.1.3.5
Review
4.0.1.1 -
- Which 2 layers of the OSI model are so closely tied that the TCP/IP combines them into one layer?
- What is the role of the data link layer on the sending device? What does it do on the receiving device?
Terms related to the physical or wireless connection to a network: WAP. ISR, LAN, NIC, WLAN
4.1.2
The OSI physical layer provides the means to transport the bits that make up a data link later frame across the network media.
What is the process that data undergoes from source node to destination?
Review the PDU encapsulation process
What are the 3 basic forms of network media?
4.1.3
The 3 functional areas that the physical layer addresses: Physical components, Encoding and Signaling
Define Encoding
Signaling:
- What is the difference between Asynchronous and Synchronous signal transmission?
- What are the 3 commonly used modulation techniques?
How does throughput differ from goodput?
What is latency?
4.1.3.4 What role do standards play in defining media?
DO: 4.1.3.5
Wednesday, November 5, 2014
ITE Chapter 1 Review
Review for test week 11/9
- What is the difference between RAM and ROM
- What are the different types of ROM
- Discuss input and out devices
- Which HDD provides the best performance - EIDE or SDD and why?
- What is considered magnetic media - find it in the backroom
- Find 4 differenty types of expansion cards and explain their purpose
- Motherboard Tour!!!
- Expansion Slots
- CPU types, Sockets, Function and architecture
- Chipsest
- Power Supply
- Selection considerations
- Voltages
- Connectors
- Ohm's Law - draw a circuit to explain the formula
- Memory chart from 1.1.2.6 fig. 2
- List the different DVI types and their purpose
- Fill out worksheet for the cables
- Fill out worksheet on graphics
- Reference 1.2.3.1 find the cables in the classroom
- What is formfactor
- Create a graphical representation of RAID 0, RAID 1, RAID 5 and RAID 1+0
- What is the unit of measure for the following components
- HDD
- PSU
- CPU
Monday, October 6, 2014
List Applications
List Applications
- Watch the video below entitled "List Applications." The link to the slides is just above the video.
- There are many application areas where lists can be beneficial. A short example program that plays a short song/jingle is created in this lesson (watch the video "Playing a song with two parallel lists"). Can you identify this song (be the first to post to Piazza - but please check whether someone else has already posted)? This program creates a block called playSong that receives two parameters as input - a list of notes, and a corresponding list representing the duration of each note. The meaning is that the note found in a particular index of the list "notes" is played by the duration indicated using the same index into the "duration" list (e.g., when index is 2, note 65 will be played for a duration of 0.15 seconds). The playSong block is called twice with the same parameters with a brief rest between each iteration. Study the code in the video and on slide 2 of "List Applications" - notice how the index loops over the length of the notes, and how the "play note" block is called by retrieving both the note and the duration from the two parallel lists. If you would like to understand more about how to play notes in Snap!, please check out the following web page (suggested by Bucky Garner) that lists the note values.
- Snap! provides a pre-existing block called "contains" that will return a Boolean value based on whether a certain item is contained within a specific list. However, in some cases, it may be useful to know the specific location in the list where an item appears, beyond just whether it exists in the list (e.g., it may be helpful to know that a specific student name is found at index 3 in a studentNames list to allow for further processing of that student). Watch the video below entitled "Searching for the location of an item in a list." Study the code that appears in this video (and on slide 4 of the presentation) and observe the check for the item in the loop using the "if" statement. Also, notice how the value of the index is reported back to the caller when the item is found, or else reported back as -1 when all of the list items have been exhausted without a successful search. Try to follow the logic of this code - ask questions on Piazza or Hangouts if this is not clear to you how it works.
Planning Ahead
Reusable software is very important to improve productivity and even correctness of software. Procedural abstraction allows us to create our own blocks that are generalized for many different contexts of usage. This lesson explored the benefits of customized blocks and also introduced the concept of lists. Make sure that you study the various list examples in this lesson and notice the pattern that is often used for iterating over a list (see point 4 above in the "Lists" section that mentions the parts of this pattern).
The next lesson will be focus on two case studies that help guide you into creating more detailed programs than what we have seen in the past lessons. You will create a maze game through a guided video, and then you will be asked to create a version of Snappy Bird by following the instructions on a 30-page tutorial. Before you move forward to the next lesson, please make sure that you understand the general programming concepts previously introduced in the lessons of Unit 3.
Lists
From csp4hs - summer 2014
Lists
- Watch the video below entitled "Lists." The link to the slides is just above the video.
- As noted in the last lesson, variables are used to store the values of computations that are made in a program. Our past look at variables considered only a single variable that contained a single value. There are many occasions when a programmer may want to group a set of values into a single variable name (e.g., a list of class grades, a sequence of notes for a song, the list of high scores for a game), rather than storing each value separately (e.g., grade1, grade2, ..., grade20). If we had to store each value in a separate variable, our programs would become complex (imagine over 1000 different variables to store the notes of a song). A data structure allows us to group information together into a single variable that can be created and manipulated. Lists are a specific type of data structure in Snap! that allow a programmer to store a sequence of values that can be individually indexed through a common variable name. In Snap!, each element in a list is indexed, starting at index location 1. For example, on slide 2 of the "Lists" presentation below, index location 1 is an "Apple" and index location 5 is "Grape." The index locations of -1 and 6 are undefined in the example on slide 2.
- Go to Snap! and look at the Variables palette, making note of the various blocks that can process lists (see slide 3 of the presentation below). These blocks can be used to create, delete, add, insert at specific location, determine the length of a lists, and access values from a list. Using a loop, it is possible to iterate over all of the elements of a list and perform some special computation.
- Watch the video "Printing the contents of a list" located below. Notice that there are three key parts to this program, which you will often find in most code that processes a list: 1) Creation and initialization of a loop counter (often called "index" or "counter"), 2) a repeat loop that iterates over the length of a list, 3) some access to the list through blocks like "item of", and 4) within the loop, an update to the loop counter to move to the next element in the list (often done with the "change" block in Snap!). Study the program that says "C S P 4 H S" and make sure that you understand the list blocks that are used and how they work in conjunction with the repeat loop.
- Watch the video "Summing a list of numbers" located below. This program creates a new Reporter block (called sum) that receives a list of integers as input and returns the sum of all the numbers in the list. The benefit of using a list is that sum can be called with an arbitrary number of integers - it can compute the sum of 10 numbers as easily as it can computer the sum of 100 numbers. There is nothing fixed in the block definition that ties it to a specific size of the list (the use of the length block enables this benefit). In the code of the block, in addition to the loop index counter, there is also a variable called tempSum that is used to keep track of the running sum of the list numbers. Make sure you understand how this block works by tracing out a sample list input and how the values of index and tempSum change during the iteration over the list. After the sum of the list is computed in tempSum, notice that the value is reported back to the caller. A sample program that uses the sum block is also shown in this video, which simply sums the values of a small set of integers and says the value to the screen.
Customized Blocks and Lists
From csp4hs - summer 2014 session
Lesson Objectives
Thus far, we have used Snap! blocks that were already existing and provided to us as part of the core Snap! language. There are many situations that may arise when a programmer needs to define their own blocks to support customized features that their program needs. The ability to customize blocks is very important to support the concept of software reuse. We do not want to reinvent the wheel each time we need a special feature in our program - creating a customized block allows us to use the block in many different contexts, saving us time and also helping to make our programs more correct (i.e., we can put extra effort in making sure a block is correct, and then reuse the block in many other contexts). In this lesson, we will learn how to make our own blocks in Snap!
Another topic covered in this lesson is an introduction to a basic data structure known as a list. In Snap! and other programming languages, a list can be used to store a collection of common values in a single variable name. For example, if a program needed to store the grades for a class of 20 students, rather then have 20 separate variables for each student, a list allows us to create a single variable name that contains all of the grades together. We also learn in this lesson how to create and manipulate lists in Snap!, and consider several contexts where lists may be used.
All of the example programs shown in the primary presentations are also coded in other videos that you can watch below. Make sure that you do not just watch the videos - try to program the examples yourself in Snap! by following along with the video screen shot.
Lesson Tasks
Please consider the following sequence of topics for this lesson on blocks and lists:
Building Your Own Blocks
- Watch the video below entitled "Build Your Own Blocks." The link to the slides is just above the video.
- Consider our original starting point in earlier lessons of this unit that focused on simply drawing a square. The code to draw a square served the purpose of illustrating basic Snap! commands (e.g., move), but this code was not very useful because it assumed a specific type of shape with a fixed length of sides. This lesson progresses through a series of generalizations where the core square code is made more reusable by adding parameters to the block that aid in specialization. For example, the fixed length of the square is removed such that the caller of the block can specify a specific length. By abstracting out the length of the side of the square, we can now reuse the block to draw squares of any size. However, drawing a square in itself is not so interesting. The next progression in this lesson is to abstract the number of sides, which will create a more general drawShape block. The caller of drawShape can specify not only the length of sides, but also the number of sides. This allows a very general block that can draw everything from a triangle to a circle.
- Watch the video entitled "From square to drawShape" below, which shows how blocks are created in Snap! When teaching this lesson, it is very important to draw your student's attention to the importance of procedural abstraction and how it can allow us to create more general blocks that can be reused in many contexts (e.g., drawShape has many more options for reuse than a square block of a fixed size - there are just not many places where a fixed square would need to be reused compared to a more general drawShape). The concept of procedural abstraction allows programmers to create libraries of software that can be reused in future contexts that may not have even been anticipated when the block was designed initially. When introducing this to your students, guide them through the same progression of a very fixed program (the first square) through the drawShape block, pointing out along the way how each new evolution of the block can support a larger number of contexts. Help them to understand how a block can be generalized by abstracting the essential parts of a shape (i.e., its length and number of sides).
- Make sure that you understand the power of procedural abstraction and how this can be implemented in Snap! with customized blocks. You should also understand the different types of blocks: Command blocks just perform an action and do not return a result (like drawShape); Reporter blocks return a value (sort of like a mathematical function); and Predicate blocks are like Reporters, except the return type is limited to a Boolean value (i.e., they only return true or false). Blocks can also receive parameters, which provide input to a block during its computation. Parameters can be of different types, as shown in the slides and videos below. Parameters can be placed in post-fix notation (e.g., the length and number of sides appearing after drawShape) or in-fix notation (e.g., the appearance of the "<=" operator between the parameters, as shown in a video below). Watch the video entitled "Max and Less-Equal," which shows how a Reporter (that is post-fix) and Predicate (that is in-fix) are created, respectively.
Monday, September 22, 2014
9/24/14 - Snap! Variables
When writing a program, we often need to store the value of some important concept used in our program, such as the value resulting from an intermediate computation. A variable is a concept in programming languages that allows us to associate a value with a symbolic name that can be used at different places in our program. There are specific rules for naming a variable, as mentioned on slide 2. It is important to assign the name of a variable as something that the variable represents. We often name our variables starting with a lower case letter. Sometimes, the best name may be more than one word, as in currentTaxYear or birthDate. In such cases, it is a convention to use what is called Camel Case, where the additional word is capitalized. These are just suggested conventions and not really the rules of Snap!
Try solving the exercise on slide 4 ("Variables" video) on your own, without looking at the answer on the later slides. The presentation offers two solutions to the "swap" concept. Do you understand these?
The last slide of the "Variables" video introduces the concept of a data type. It is helpful at times to know what values a particular variable can represent, such as numbers, strings, or other types of values. We will talk more about data types in a future lesson in this unit as it relates to creating our own blocks and being able to pass in values to those blocks.
The video below that will show you how to create variables in Snap!, including a solution to the swap exercise presented on slide 4.
Try solving the exercise on slide 4 ("Variables" video) on your own, without looking at the answer on the later slides. The presentation offers two solutions to the "swap" concept. Do you understand these?
The last slide of the "Variables" video introduces the concept of a data type. It is helpful at times to know what values a particular variable can represent, such as numbers, strings, or other types of values. We will talk more about data types in a future lesson in this unit as it relates to creating our own blocks and being able to pass in values to those blocks.
The video below that will show you how to create variables in Snap!, including a solution to the swap exercise presented on slide 4.
9/22/15 - Snap! Core Programming Structures
Lesson Objectives
This lesson introduces the three core structures that can be found in programming languages: sequence, decision/conditional (if), and iteration (loops) constructs. An important concept in conditional and iteration statements is that of a Boolean expression. The lesson will introduce comparison (relational) and Boolean (logical) operators that can be composed to express statements that are evaluated to true or false. The ability to express Boolean expressions is core to the test conditions of decision and iteration statements. Programs also need to store values as they perform a computation. The ability to declare variables, and the notion of data types, are also discussed in this lesson. You are encouraged to type in all of the examples in the slides/presentations/videos yourself in Snap! and try to get them to work. Overall, this lesson will take much more time to complete than past lessons if you decide to follow along and try out all of the programs on your own. Those who have taught computer science before will likely find these lessons as fundamental, but the context of presentation within Snap! may be offer new ideas.
Class Exercise - Decision Structure - grade converter from video
Compose the solution using if/then and boolean expressions
Tuesday, September 16, 2014
Lesson Plans Comp 2 and 3 9/16/14
Today you will work on the 1st 2 sections of the Computer Science programming piece.
1. Understand what software engineering is and why it is important to thoughtfully plan out you program before coding it.
2. Get acquainted with Snap! and code a small program or two.
Introduction to Networking
Download the newest version of packet tracer and get it running on your Mac. I have found that wine wrap has been the most stable. Work with each other to figure it out.
Recap last weeks work -
Terms:
End Device
Intermediary Device
Networking Media
Encoding
Clients and Servers
Peer to Peer
Physical Topology
Logical Topology
Chapter 1 Objectives:

Continue to read Chapter 1 starting with 1.2.2.1 and take notes
Lab 1.2.3.3 Converged Networks
Pay attention to Internet, Intranet and Extranet
Cont. to read 1.2.4 (Connecting to the Internet) and do the packet tracer exercise
1.3 (Converged Networks) and the Lab
1.4 The Changing Network Environment
It is OK if you decide that you would like to spend more time on the programming piece today.
You may spend some time creating a proposal for the middle school Hour of Code.
Section 2 - Snap! Overview
Snap! Overview
Lesson Objectives
Before learning about some of the general constructs used in programming that are covered in the rest of Unit 3, this lesson provides a general overview of the Snap! environment. You will create two short programs, and learn how to store your own programs in several different ways. The lesson is composed of a short video that you are encouraged to follow as you build your own similar programs and become comfortable with the Snap! browser-based environment. There are many things that will not be covered in this lesson. In fact, the entire unit will not cover every concept in Snap!. Our goal is to provide you with a set of experiences that allow you to understand some of the core ideas in programming, such that you have the confidence to then explore more on your own.
When learning a new foreign language, I have observed that it is easier to read in that language than to write in the same language. It seems that understanding something already provided is easier than synthesizing something new on your own. It takes practice to be able to write new expressions in a foreign language. I have found the same to be true in learning how to program. It is often the case that students can understand a program that is given to them much better than they can actually produce that same program on their own. The potential trap is to think that some proficiency in reading and understanding a program is the same as creating a new program on your own. In the same way that it takes practice to be able to write and speak in a new foreign language, you must practice and go through some hands-on activities in order to grasp the skill of programming on your own. It will be very tempting to look at a program provided to you, understand it, and think that you could produce that yourself. We encourage you instead to get involved with the coding activities that will be suggested in this unit that are designed to give you more practice in developing your programming skills, which will assist you in teaching your own future students about programming.
Lesson Tasks
Please work on the following during your exploration of this lesson:
Visit the Snap! website and look around at some of the information provided by the Snap! team. A gentle warning - there is a Snap! reference manual available. However, we suggest that you wait until the end of this unit before you try to read the manual. The Snap! manual has several advanced concepts that are discussed very early in the manual. The manual may be more accessible to those who already teach computer science, but the reference manual may be challenging to understand at first for a new CS Principles teacher who has never programmed before.
Watch the video linked below. There are no slides for this lesson. A suggestion is to first watch the video, and then come back to the subsequent steps below to review the video and try some hands-on activities.
Go to the URL that actually runs Snap! in the browser: http://snap.berkeley.edu/run. Be adventurous and explore around - you won't break anything important at this stage! Look at the different categories in the palette area, and how new blocks emerge when you click on each category. Can you guess what some of the blocks might do? Can you summarize in your own words what some of the categories represent as a theme? For example, what is the core theme of the blocks in the Motion category?
Try duplicating the "Hello World" program that is introduced at the first minute mark of the video. Pause the video in one tab of your browser, and try to duplicate what is being done in your own Snap! environment. Try to run your program by clicking on the green flag.
Explore the various ways that you can save this program. First, export the program as an XML on your desktop. Can you see where the file was then added to the Desktop? Try to then create a New project in Snap! that is empty, and then see what happens if you then import your saved program back into Snap! This file is not intended to be read by humans, but just an internal representation of your program that Snap! can read and write. The XML format (Extensible Markup Language) is a very important standard for sharing information, and is used by Snap! as a representation for storing your program.
Click on the cloud button at the top of the Snap! screen. You may want to try to create your own account by signing up (there is a sign-up button that you can click, which will generate an email to you with account information). This is not necessary now, but will be useful later.
Create a new project in Snap! (the "New" option in the file icon at the top of the screen). Then, try to create the square drawing program on your own that is introduced in the second half of the video. In particular, experiment with the "duplicate" block option that is shown in the video as a way to save time in dragging and dropping blocks (time 5:20 in the video). Were you able to get the ability to ask the user for the size of each side? Do you see how more general that makes your program, rather than drawing a square of the same size each time? We will come back to this idea in a future lesson in this unit.
Congratulations - some of you who may have never programmed before just created your first two (albeit very simple!) programs!
Please note: If the video below appears blurry, please allow time for the full resolution to download as a stream. You may also want to try viewing all of the Snap! screencasts that are in this unit in Full Screen mode, or in a separate browser tab.
Watch the video below!!!
https://www.youtube.com/watch?v=jFs3pn7zzoc
Subscribe to:
Posts (Atom)